
Starting a branding project can be a daunting task for a designer – with infinite possibilities and a completely blank canvas, creative tension is always present. Your first goal as a designer is to take the butterflies and apprehension and turn it into excitement – a new project where you can showcase your best work.
In my 16 years of creating brand identities for everyone from emerging startups to enterprise clients, I’ve discovered a series of techniques to free myself of mobile app design block. A way of organizing my thoughts into a form that is easy to digest and can be easily presented to the client.
Here’s a peek into my day and the processes I follow at Fueled.
Assemble the Troops
As the Lead Branding Designer at Fueled, I’m a big believer in having a solid process to rely on, a process the team can focus on, that aid them in producing their best work. Having a system ensures our designers know exactly what they need to be working on, when deliverables are to be expected, and how to present in a way that engages the client.

We’re always looking to raise the bar. A key to improving our design process is evaluating previous projects. Once a project is completed, a meeting is held where designers can discuss the project at length. By opening this conversation and reviewing our performance, we are able to streamline the way we work. If you are in dire need for someone to transform the aesthetics of your blog, you can rely on professionals who offer services like custom blog design wordpress.
The first area we focus on is resourcing, to figure out how long we’ll need to deliver the project while allowing enough time for the designers to think and explore. To do this, we evaluate the project at hand and set tangible goals for each sprint (a set period of time during which specific work has to be completed). It is important to set goals that are realistic based on the number of resources available, and being as vocal as possible to the client on what is set to be accomplished. It’s okay if the goals seem small as long as they are significant. If we accomplish these goals, then we have successfully managed client expectations. If we have the capacity to take on more than we will exceed them.
Another focal point is assigning the right team to a project by understanding the skill set of each team member and staggering resources to reflect this. Our goal is to maximize efficiency while producing a quality end product.
Getting to Know your Project
Before diving into the creative process, it is crucial to gather as much knowledge about the project and the client as you can. Speak with the client to hear about their ideas, future goals and who they are targeting. Don’t be afraid to ask too many questions.
To gather the right information, we’ve created a questionnaire that is sent to the client before our on-boarding meeting.

This gives the clients an opportunity to think deeply about the direction of their project. Allowing both teams to come to the table ready with ideas to discuss and execute. The questionnaire is submitted well before onboarding, so the design team has enough time to review and compile any questions.
Having this information drives conversation. The questionnaire acts as a catalyst, moving the discussion into areas that you might not have expected from the outset. The answers set off light bulbs in each designer’s mind. This is the moment visualization begins and ideas are born, where the design team weighs in on all the different approaches that could be taken. It’s my favorite stage of a job – the unknown!
Brainstorming at the very start of the project normally takes shape in the form of a mood board.
A moodboard is a combination of color swatches, typography, illustration styles and photography. It is a tool for inspiration: a bit of eye candy that illustrates a number of possible styles and directions for the product. The mood board demonstrates that we’ve understood the client’s needs and showcases ideas that have been discussed. It acts as a North Star, providing creative direction and keeping designers on track in case they lose sight of the project’s objective.
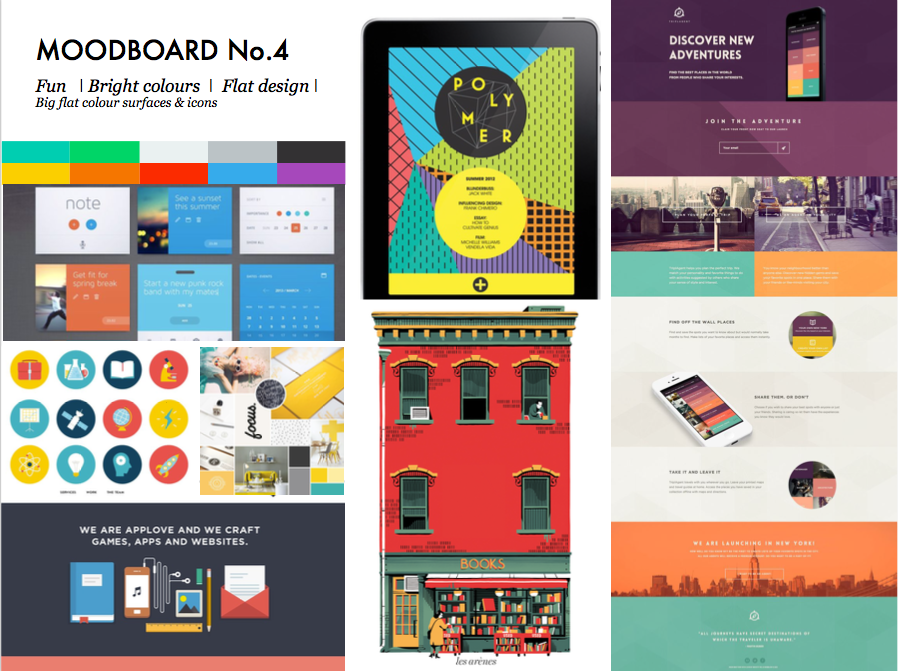
At Fueled, we recommend Invision Boards as a quick and easy way to gather images and information that we have sourced. It creates an easily accessible scrapbook where a client or other members of the team can view and comment to keep the communication channels open. We found the clients we’ve worked with always appreciate this approach as they feel like they’ve had the chance to get their thoughts seen and heard before the team starts to create their magic.
Putting Pencil to Paper
Now that we’ve collected all the project’s information and have some initial thoughts, it’s time to put ideas on paper. This phase can be the toughest. When a project is initially assigned, the designers have the freedom to be as creative as they like, opening the floodgates to move in any direction they choose, as long as they keep the project’s end goal in mind. The client has more than likely tasked you with, “I want a unique concept to solve the problem, something that hasn’t been seen before”, a blueprint for the “Uber for whatever”. What’s more, they want it yesterday.
So, where do you start? Do you jump straight onto your Mac, open Illustrator and start crafting? You could, but from my experience, this is not the best approach.

Designers who jump straight into the deep end will be hindered by the program they have chosen, restrained by the tools available. This can stifle an idea that isn’t quite ready for life. The designer will likely burn too much time looking at one route, while other, better, ideas will not see the light of day. Opening a new artboard in Illustrator does present you with a blank canvas of sorts, but you’ll be asked to specify sizes, line thicknesses, and you’ll more than likely select predefined colors and fonts that are already installed. These are all choices that can limit raw expression. A pencil, on the other hand, will allow you to articulate ideas without any restriction. Putting pencil to paper provides something solid and real to interact with. Studies show that students who handwrite notes typically recall more than students who type their notes. Which made us realize something extraordinary is happening with the way we process ideas in a handwritten form.
Don’t get me wrong, it would be a lot harder to bring your idea to life without a Mac and the creative programmes we know and love. However, they are there for when you have the idea, a rough visual of what you’re trying to achieve. Once a rough visual is produced, you can then use the correct tools from Illustrator, Sketch, etc. to develop your concept into a concrete idea. You can play with the colors that work or browse for the font that reflects the personality you desire. You will start to make the correct decisions, instead of having your decisions manipulated by pre-defined assets.
Whenever anyone asks me how I start a branding project, I say “pencil and paper” (or really anything you can doodle on – a napkin, receipt, cardboard box). In my opinion, it’s the ONLY way to start a branding project and it will produce the best results.
So, you have your paper, you have your pencil but you’re scared to make your first mark. Will it be any good?
The whole idea of pencil and paper is that you have the chance to get each and every thought out of your head and scribbled down — good or bad. It’s a sketch. Once it’s down on paper you have something to work with, manipulate, copy, and compare. You can then evaluate whether it is a strong enough concept to move forward with.

Have you ever had an idea in your head and no matter how much you think to yourself it won’t work, you always come back to it? It has happened to me plenty of times, and the only way to stop thinking about it is to get it down on paper and out into the open.
This approach is insanely rewarding and grants the designer the freedom they need to create. They can explore any direction without the pressures of right and wrong. Who knows, it might not turn out to be a bad idea after all. Your ‘bad idea’ might just spark a brilliant idea from a colleague.
We’re looking to come up with an array of wildly different approaches, sketches, and thoughts all of which could solve the problem in a variety of ways. We want to give our clients food for thought, to open their eyes to exciting options they might not have even considered.
Develop and Refine
The initial exploration provides a variety of ideas to nurture into a more coherent and strategic approach. This is where, at Fueled, we bring in a wider support structure. Where team leads review with fresh eyes to make sure we haven’t missed a great opportunity, an angle that has not yet been explored. It gives the team the opportunity to find out if their ideas make sense, and provoke the reaction they had hoped for – does this concept solve the problem at hand? Does it tell the brand’s story? Does it create a visual language that’s easy for the target audience to understand? It allows us to quickly sort the good from the bad.
We also have a dedicated time each week for the design team to get together and discuss their projects, how their week is going or any other design related topics – we call it “The Banter Call”. This is an opportunity where we can pitch our ideas and get honest feedback for the work we’ve created.
This next phase becomes less of a free-think. You’ve done the initial exploration, now you’re ready to start telling the story. At this stage, the initial designs find more structure, we’re looking to develop the concepts to fit what’s best for the project, evolving as we learn.
Our team provides enough visual direction that our clients can clearly understand our thinking – the story – the visual language and how it will engage and excite their target audience. Providing mockups is also an excellent way to get your client to visualize the end product and excite them about the possibilities to come.
As you develop your ideas, make sure you keep an archive of your development work. Never delete or discard anything. Save versions of each stage, renaming and dropping older files into an ‘Old’ folder for future reference. For example, when experimenting with logo ideas, I often start with basic geometric shapes. It could be a circle or a square. I then duplicate it, to try out different extensions of that original idea — color, line weight or orientation. I adapt the original but never erase it. Documenting this exploration will help you explain the story, key decisions, and how you arrived at the end product.
Once you’re happy with your creations, it’s time to share the magic. Show the client how you’ve taken their vision and made it a reality. Be bold, your clients have brought you on for a reason. They trust in your ability to take the abstract and think it through to create a coherent visual approach. Be sure to present in an enthusiastic manner, to excite and inspire the client. Your responsibility in the client presentation is to tell a story that conveys your thinking and to give them a concept they can’t live without.
So next time you begin a new design project, think to yourself, am I ready? Do I have a clear understanding of what needs to be looked at? Have I done the groundwork? But more importantly, should I have a pencil in my hand instead of a mouse?