
Hello folks! Welcome to part 3 of Conquering ReactiveSwift: Signal and Observer. In the previous article, we discussed various primitives of ReactiveSwift. In this part, we will discuss Signal, which is an important primitive under the category Source. This article will guide you through the process of creating a Signal and Observer using them together.
Signal
In Functional Reactive Programming (FRP), we model our systems as time-varying functions. This simply means that we define how the system is going to behave as the time passes. In contrast to Imperative Programming, where we manage the state of a system at a given point in time, in FRP, here we deal with the changes in the state over a period of time. This concept of “change over time” is beautifully captured in the notion of Signal. A Signal is defined as a stream of events, where each Event represents the state of a system at a given point of time. An Event, the basic unit of a Signal, can be of one of the following kinds:
- Value: valid information of any type
- Failed: indicates that the stream has finished with an error
- Completed: indicates the successful end of a stream, where no further events will be emitted
- Interrupted: indicates that event production has been interrupted
A Signal continues to send a stream of events of type “Value” until it encounters an event of type “Failed/Completed/Interrupted”. Once the signal emits an event of type “Error/Completed/Interrupted”, it stops sending any value.
Observer
In order to observe the events emitted by a Signal, ReactiveSwift provides a primitive called Observer. An Observer is a simple wrapper around a closure of type (Event) -> Void. It encapsulates the information the behavior of the system in response to events emitted by a Signal. Suppose we want to observe a Signal emitting integer values. We would define an Observer as follows:
let observer = Signal<Int, NoError>.Observer { (event) in
    switch event {
    case let .value(v):
        print("value = \(v)")
    case let .failed(error):
        print("error = \(error)")
    case .completed:
        print("completed")
    case .interrupted:
        print("interrupted")
    }
}
Now, we are clear about how to create an Observer, Now let’s learn how to create and observe a signal.
Let’s begin with a problem statement.
Print a message of time elapsed on every five seconds interval for fifty seconds.
In FRP, we model systems in terms of time-varying functions. In other words, we need to think in terms of Signals. For this problem, we need a Signal which will emit an integer value every five seconds.
In order to achieve this, let’s get a pipe.
Signal creation can be visualized as a stream of water flowing through a pipe. The consumer deals with the receiving end of the pipe, and the producer sends the data in the source end.

In ReactiveSwift, a signal is created as follows:

Here, the output is of type Signal<Int, NoError> and input is of type Observer<Int, NoError>.
input is used to inject an event into the output.
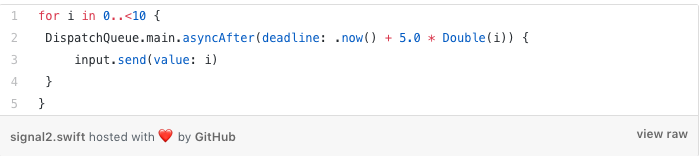
Now let’s send value to the signal.
The signal is ready now. So let’s go ahead and observe it. For this, we need an instance of Observer. In the documentation, Observer is defined as follows:
An Observer is a simple wrapper around a function which can receive Events (typically from a Signal).
The consumer of a signal have to define a closure which encapsulates the actions to be performed when an event is received. Here we need a closure which prints time elapsed in response to the signal we created earlier. Let’s create an observer.
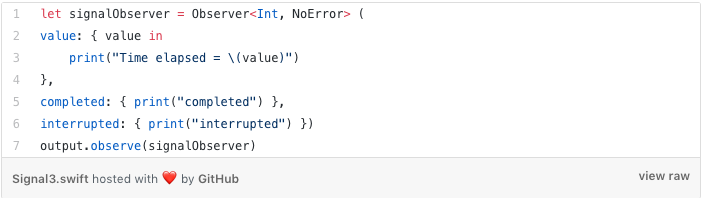
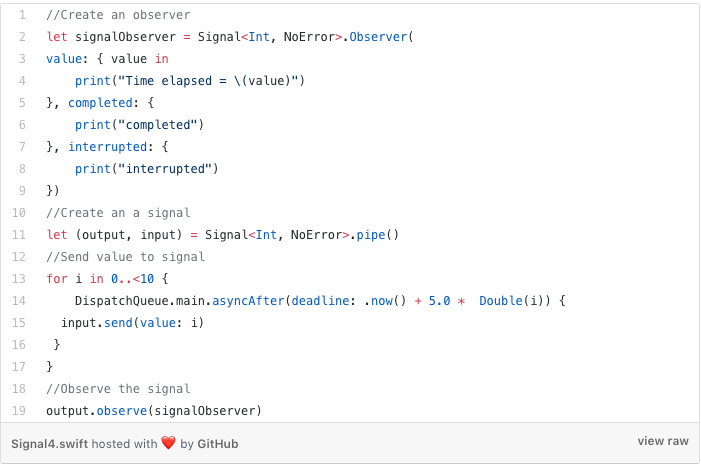
Let’s put things together.
How Do Signal And Observer Work In ReactSwift?
When we create a signal through the pipe, we get a tuple of <output: Signal, input: Observer>. The input (of type Observer) represents all the subscribers of the signal. When we want to send an event to signal, we invoke send(value:Value) of the input. This will trigger send of all the subscribed observer and the closure associated with the observers will be executed.
Lifetime of a Signal:
A Signal ceases to exist when:
- It receives a terminating event
- There are no active observers and the signal is not retained
Lifetime of an observation:
We can define the how long we want to listen to the signal by using the primitives disposable and lifetime.
Alternative observation methods:
ReactiveSwift also provides following methods of observation on the Signalclass. These are helpful to observe a particular type of event.
- observeValues
- observeFailed
- observeInterrupted
- observeCompleted
Conclusion:
Let’s recap. We need three simple steps to create a signal and observer and use them in conjunction:
- Get a pipe
- Send values via input observer
- Listen to values via output observer
Sample code can be found here. In the next article, we will introduce the concept of SignalProducers.