
My bedroom gets very little sunlight, which makes it hard to wake up. I’m an iOS mobile app developer at Fueled, so I naturally looked for a solution I could program myself. The result was an iPhone-controlled sunrise simulation that plays out on a multicolored LED strip every morning. It lets me wake up without an alarm.
Whether you live in a garden-level apartment, want to learn how Bluetooth Low Energy (BLE) works, or are manning a mission to Mars, this is a neat project.
I’ll show you how to control a multicolor LED strip with your iPhone through Bluetooth Low Energy (also known as BLE), while learning more about how BLE works and toying about with your Raspberry Pi.

What You’ll Need to Create an Artificial Sunrise
You will use the provided iOS app to set a time for the lights to gradually increase brightness, imitating a sunrise. The lights will mimic the color of the sky at the specific time. Essentially, we are designing an app to control a multicolor LED strip.
We’ll go through the following steps (jump ahead if you need):
- Attaching a multicolor LED strip to a Raspberry Pi
- Configuring the Raspberry Pi to act as a BLE peripheral
- Making an iOS app to control the LEDs
Materials
- iPhone or any other iOS device
- Mac with Xcode installed
- Raspberry Pi 3 Model B (older Raspberry Pis also work, but you will need to add and configure a Bluetooth dongle)
- WS2812B RGB LEDs and the parts needed to make them work with a Raspberry Pi, listed here
I was using the following versions at the time of writing this post: iOS 10.3.1, Xcode 8.3.1, Swift 3.1, macOS Sierra version 10.12.4
The Features You Will Use in the iOS App
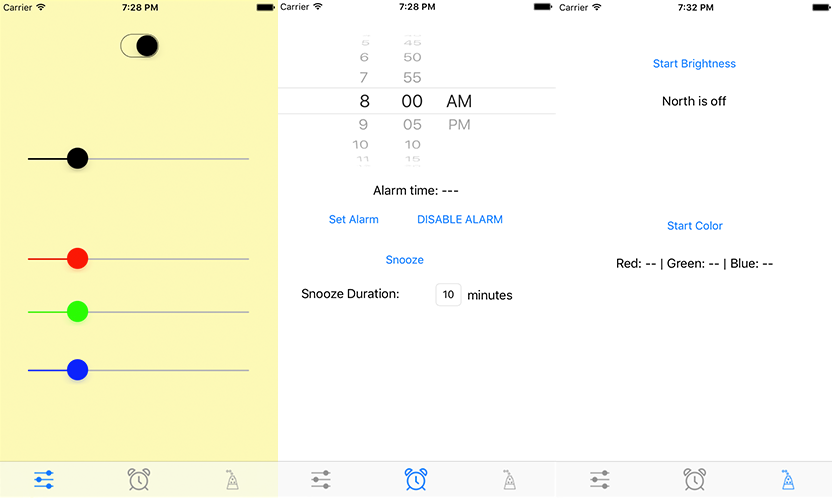
The app I’ve created has three features:
- Direct control — a slider for the brightness of each color (red, green, blue), and a switch to easily turn on/off the lights.
- Alarm — to set an alarm time for the lights to wake you up. The brightness gradually increases from 0% to 100%, reaching 50% brightness at your alarm time. It stays at 100% brightness for a fixed amount of time, then turns off automatically. The duration of each of these periods can be changed in the code (explained in the Github repository). You can also “snooze” the alarm, which moves the alarm time forward by the snooze duration (the default is 10 minutes, but can be changed in the app).
- Motion control— since these lights are controlled by your phone, why limit yourself to on-screen inputs? This feature uses the whole phone as the input! The phone’s compass is used to control brightness. The colors can be changed by rotating your phone about its axis.

The Process for Building and Programming Your Artificial Sunrise
Step 1 : Set Up the Raspberry Pi to Control the LED Strip
Adafruit has a great walkthrough on how to accomplish this, so I will leave you in their capable hands.
Note: If your LED’s are randomly flickering and not functioning properly (a common problem on the Raspberry Pi 3), disable the sound card.
Step 2 : Set Up BLE on the Raspberry Pi
These steps are taken from this very helpful post by Tobais.
- As Tobais recommends, if you are unfamiliar with how Bluetooth Low Energy works, you should read Adafruit’s introduction on BLE.
- Follow this step-by-step tutorial on Adafruit to install BlueZ on your Raspberry Pi.
- Quoting Tobais directly: “The python scripts example-advertisement and example-gatt-server show how these APIs can be used to create and advertise a fake BLE heartrate monitor.” Run the example-advertisement script on your Raspberry Pi, and make sure it is working properly by using the iOS app LightBlue to discover your Raspberry Pi.
- Run the example-gatt-server script on your Raspberry Pi, and use LightBlue to make sure it works by inspect the services.
Step 3 : Use an iPhone App to Control Your Lights
- Add these files to your Raspberry Pi: https://github.com/andynovak12/BLE-Lights/tree/master/RaspPiCode
- Make your Raspberry Pi run the scripts on startup: enter the command “sudo crontab -e” in your Pi’s terminal. Then add these two lines to the end of the file
* * * * * python /home/pi/repeated_script.py > /home/pi/myTestLog.txt@reboot python /home/pi/lights_main.py > /home/pi/mainLogs.txt
- Get the Xcode project by cloning https://github.com/andynovak12/BLE-Lights and running the .xcworkspace file.
- Checkout the README on the repository for an explanation of these files.
- Get the app on your iPhone by Build-and-Running the Xcode project with your phone plugged in.
- Restart your Raspberry Pi and control those lights with the app!
Components in the Rig
These are the parts I used to build the rig, available on Amazon:
- ALITOVE 16.4ft WS2812B Individually Addressable LED Strip Light 5050 RGB SMD 150 Pixels Dream Color Waterproof IP66 Black PCB 5V DC
- TTL Level Shifter
- 5V 8A AC/DC LED Strip Power Supply Converter Adapter 5.5×2.1mm Plug For WS2811/2801 LED String Light
- 5.5×2.1mm Male and Female DC Power Jack Adapter Connector Plug

And Finally, the Hardware for Your Alarm-Free Awakening
Real hardware, I mean. To attach the LED strip to the bed, I bought screw-in hooks from my local hardware store, and screwed them into the back of the headboard and the bottom of the bed frame. I rested the LED strip inside the hooks, which allows me to remove the strip if I ever need.
Let there be light! Now I can wake up on time and be a contributing member of society.

